 |
Since i do not own a Creativision Cassette Storage Module i was unable to load/save my (very creative) CreatiVision Basic programs... :-(
And using the membrane keys is is not a real pleasure to type them in each time ;-)
So tried to find another solution to save/load to.
|
 |
At first i needed to find out the pinout of the CreatiVision Cassette port.
- Pin 1: Used to play music from a second track on commercial Creativision Tapes while loading.
- Pin 2: Here is the Data I/O (direct connection to one Pin of the PIA Chip) Signals are rectangular between 0V and +5V. The PIA Pin is switched by Software for In- or Output.
- Pin 3: Not sure what Pin 3 is used for (maybe some kind of "key-pressed" feedback?
- Pin 4: Stays High until CSAVE or CLOAD command is executed. I use this Pin for remote controlling the tapemotor.
- Pin 5: Same as Pin 4.
- Pin 6: +9V Output
- Pin 7: Ground
|
 |
After simply connecting the I/O line and GND to my Mixing desk to amplify and "shape" the signal i was able to save and load programs directly from my "Audiophile" Notebook Soundcard.
This worked, but was very unreliable, fidgety and used much equipment on my desk.
|
 |
So i decided to build a small amplifier circuit.
Using only 3 parts (LM7805 to create +5V ot of the +9V from the console, LM386 amplifier and a 10KOhm variable resistor)
With this amplifier i was able to save to the "mic" jack of my build in Notebook Soundcard (During save i did not use the amplifier at all, just simply connected the I/O to the mic-in). And load from the "headphone" jack (this time thru the amplifier circuit).
Worked very well!
Still it is a little fidgety to adjust the resistor (without an osci it is a lot of trial and error...)
|
 |
So i thought: Maybe i can use a Commodore Datasette! The Datasette will do all the necessary signal conversion for me! And they are very cheap to get...
Here is the pinout:
- Pin 1: Ground
- Pin 2: +5V input (for electronic)
- Pin 3: Motor (+6V input drives the motor)
- Pin 4: Data Out
- Pin 5: Data In
- Pin 6: is grounded, when a key on the tape is pressed.
|
 |
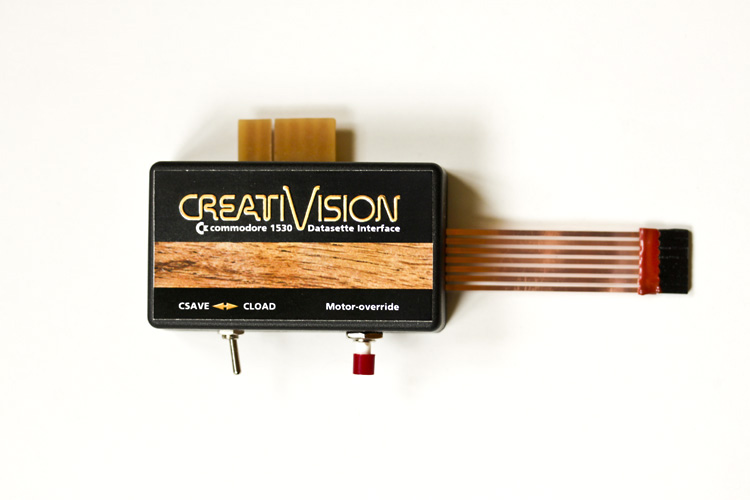
Here is my prototype for the CreatiVision Datasette Interface.
- It works like a charm!
- Perfect save/load quality!
- Easy to use!
- No adjusting whatsoever!
It consists of only a few parts:
- 7805 for the tape electronics
- 7806 for the tape motor
- TIP42 transistor to switch the motor on/off by remote
- one two-way switch to select save or load
- one pushbutton to override motorcontrol to allow for spooling.
- 4 wires and a 7Pin plug or a 7Pin flat flexible cable connector to connect to the Creativision Cassette Port.
- and a box to put it into ;-)
|
 |
Here is the PCB i designed ...
Download the PCB Design and the Silkscreen for etching your own board (*.pdf):
Creativision Datasette Interface PCB Layout
Creativision Datasette Interface Silkscreen
|
 |
Here is the Design for a label for the Interface
Download Label Design (*.jpg):
Creativision Datasette Interface Label
|
 |
Label attached to first dummy... |
 |
Update 25.3.2012:
As i have broken my collarbone last monday => work on finalizing and releasing all necessary files is a little postboned :-)
But i hope to finish this project in the next weeks...
Greetings TOM:-)
|
 |
Update 30.03.2012:
Finally i got tired of sitting around and my left arm is relatively "useable" again...
Work on the Creativision Datasette Interface is finished!
Here is the first etched pcb...
|
 |
...cut and drilled. |
 |
All the necessary pieces. |
 |
First Test of the final Creativision Datasette Interface...
Works perfect!
Yippee!
|
 |
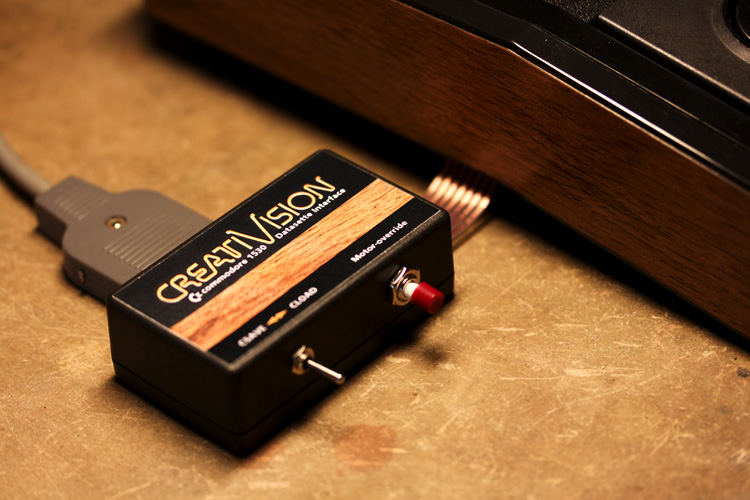
With its flat ribbon connector it fits even with the sidepanels on the Creativision console attached. |
 |
It really looks cool ;-) |
 |
So if you need such an interface:
Build one yourself or contact me...
The first batch is ready for shipping!
|
 |
The Creativision Datasette Interface comes with a User Manual. |
 |
Here is the inside of the User Manual.
The Interface is as simple as Plug & Play!
Here is the manual in *.pdf format:
Creativision Datasette Interface Manual
|
 |
Each Creativision Datasette Interface is handmade, tested and has a unique serialnumber.
To order your Creativision Datsette Interface -
contact me here:
|


